‘Mbps’ stands for ‘megabits per second’ and it measures the download speed of your broadband connection. It is the maximum speed at which you can download data from the internet.
Broadband
Sign Up
-
What does ‘Mbps’ mean?
-
What is BYO Modem?
You can sign up to one of our broadband plans and bring your own modem. Your modem must be suitable for use on Fibre or VDSL/ADSL and must be compatible on Black Box Power’s broadband network. No contract term (only 30 days’ notice will be required as Broadband charges are paid in advance) and technical support is not available. Phone packages are not available.
-
How long will it take for my broadband to be set up?
If you have requested a Black Box Power modem, it will be sent out 3 working days before your connection date. If you are using your own modem, you can be connected within 5 days. We will send you a text message once your broadband has been connected.
-
Will my electricity pricing change if I sign up for broadband?
No, your electricity rates will remain the same.
-
Do I need to be an electricity customer to sign up for broadband?
Yes, you need to have your electricity with us to sign up for broadband.
-
Are your Broadband prices GST inclusive?
Yes, our Broadband rates include GST.
Getting Connected
-
Setting up your D-Link Modem-Router
Once you have received your modem in the mail, and you have received a text message from us telling you your connection is ready, you can get your D-Link Modem-Router broadband set up in just a few minutes.
D-Link Modem-Router Hardware Overview:
Power LED A solid green light indicates a proper connection to the power supply.
2. DSL LED A solid green light indicates ADSL/VDSL sync. 3. Internet LED A solid green light indicates an Internet Connection. 4. WAN LED A solid green light indicates a WAN port is connected. 5.
Ethernet LED A solid green light indicates LAN port is connected. 6. Wi-Fi LED A solid green light indicates that Wi-Fi is operational. 7. WPS LED A solid green light indicates the WPS process is active. 8. USB LED A solid green light indicates a USB device is attached. 9. VoIP LED A solid green light indicates a phone service is active. 10. Reset Button Press and hold to reset to factory default settings. 11. Power Button Press to turn the device on or off. 12. Power Port Connect the supplied power adapter. 13. USB 3.0 Port connects USB devices. 14. Wi-Fi Button Push to turn Wi-Fi On or Off. 15. WPS Button Push to enable WPS Connect with wireless clients. 16. VoIP Ports Connect your analogue phones. 17. LAN (1-4) Ports Connect Ethernet devices such as computers, switches and game consoles. 18. Ethernet "Connect an active Cable/NBN/UFB Modem to use the DSL-X1852E as
a "Residential Gateway."19. DSL Port Connect to a DSL enabled telephone line and supplied filter/splitter. -
Bring your own Broadband Modem Guidelines
We recommend using a Black Box Power modem, but if you decide to bring your own modem, please see below the following configuration that your modem must support for it to be compatible.
Please note, if you choose to bring your own modem, technical support is not available.
Black Box Power Broadband plans are compatible with a range of different modems, however not all modems will be compatible with our service or work as efficiently as one that is provided. Generally, modems are quite straightforward to set up and don’t require much manual input, however if it doesn’t work when you plug it in, you may have to configure your modem with the below settings.
For Fibre:
You may not need to place all settings below but the most important are in Bold:
Interface
Ethernet WAN interface that supports 802.1Q Encapsulation
VLAN Tagged
Disabled
VLAN ID
N/A
VLAN Priority
Disable
My Internet Connection is
PPPoE
Username
user@pulse
Password
Password1
Reconnect Mode
Always on
Address Mode
Dynamic IP
MTU
Auto
Enable NAT
Enabled
IPv6
Enabled
DNS Type
Obtain a DNS server address automatically
For ADSL:
You may not need to place all settings below but the most important are in Bold:
Interface
ATM0
VPI
0
VCI
100
VLAN Tagged
Disabled
Encapsulation
VC MUX
ATM QoS
UBR Without PCR
My Internet Connection is
PPPoA
Username
Choose your own
Password
Choose your own
Reconnect Mode
Always on
Address Mode
Dynamic IP
MTU
Auto
Enable NAT
Enabled
IPv6
Enabled
DNS Type
Obtain a DNS server address automatically
For VDSL
You may not need to place all settings below but the most important are in Bold:
Interface
PTM0
VLAN Tagged
Enabled
VLAN ID
10
VLAN Priority
Disable
My Internet Connection is
PPPoE
Username
Choose your own
Password
Choose your own
Reconnect Mode
Always on
Address Mode
Dynamic IP
MTU
Auto
Enable NAT
Enabled
IPv6
Enabled
DNS Type
Obtain a DNS server address automatically
For more information on how to update your settings, please refer to our website.
-
How fast will my broadband speed be?
Our broadband speeds are based on the local fibre companies headline speeds. You may experience higher or lower speeds than this due to factors such as, services are not available in all locations, the performance of your modem, location of the server you’re connected to, the performance of your device and your in-home Wi-Fi setup can impact the speeds experienced.
-
I received my modem after September 2022, how do I set up my DIR-2680 modem?
Please note, this is only required if you have performed a factory reset. To set up your modem for use after a factory reset, please follow the below steps. To begin, please ensure your power light is blue. There are two options to configure your modem, either using the D-Link Wi-Fi app as covered below, or using an internet browser such as Google Chrome, Firefox, or Safari. Tip: If you are using a mobile, it is best to turn off your mobile data for this process.
Option 1: Using your smartphone and the D-Link App to set up your Modem:
1. Search and install the free D-Link Wi-Fi app available on the App Store or on Google Play.2. Launch the D-Link Wi-Fi app from the home screen of your device.
3. Tap Install New Device in the middle of the screen.
4. Tap YES to scan the setup QR code located on the Quick Install Card and proceed to step. Alternatively, you can tap NO to proceed to step 6.
5. If the QR code is not scanned, Select Router and select DIR-2680 from the list of available devices. Tap NEXT to continue.
6. You will now be presented with an on-screen guide. PLEASE IGNORE the following screens tapping NEXT on each screen until you see the circular progress counter. If you are presented with NOTHING, you need plug or restart your router. Here is a summary of the remaining steps: a) Wait for the top LED light to turn blue. b) Connect to the Wi-Fi with the Username and Password shown in the App. c) When prompted to select Internet Service Provider, select OTHER and tap NEXT. d) Tap Yes to enter an Internet Username and Password. Use dlinkdefault as both the username and the password. Tap NEXT. e) Set you own Wi-Fi network name and password or keep the one shown. Write it down somewhere. Tap NEXT. f) Set an Admin password for your device. You will need this if you want to change device settings through the web-based user interface (e.g., admin2680). Tap NEXT. g) Choose to keep your device up to date automatically. Tap NEXT. h) Tap SAVE.
7. Process complete. You can now connect to your Wi-Fi network using the Wi-Fi name and password. Tap FINISH to end the setup.
Option 2: Using the Setup Wizard through the web configuration utility.
1. Connect your device to the router’s LAN port via your own network cable, or by connecting your device to the router’s Wi-Fi. When the network has connected, open your web browser, and enter http://192.168.0.1 in the URL field as shown.
2. If this is your first time logging in, the setup wizard will automatically appear.
3. Agree to the Terms of Use and Privacy Policy then click Next and follow the on-screen instructions to configure your new D-Link router and connect to the Internet.
4. From the Internet Service Provider list, choose Others. Click Next. (If you are presented with ‘Configure Your Internet Connection’ please check your cabling and that your Fibre ONT is powered on. Once corrected, click Back until you are at the start of the Wizard and try again).
5. Enter an Internet Username and Password. Use dlink default as both the username and the password. Click Next.
6. Type in a Wi-Fi Network Name and Wi-Fi Password to setup your Wi-Fi network. Your wireless clients will need to have this password to be able to connect to your Wi-Fi network. Click Next to continue.
7. To secure the router’s configuration access, please enter a new AdminPassword. You will be prompted for this password every time you want to use the router’s web configuration utility. Click Next to continue.
8. Confirm your time zone is Pacific/Auckland. Click Next to continue.
9. Choose to ‘Keep my device up to date automatically’. Click Next and Next again to finalise the settings or Back to make any changes.
10. Please wait while the device settings are saved. Do not turn off or unplug your router during this time. Your setup is complete. You can now connect to your Wi-Fi using the password.
-
How to update your modem settings if you are using your own modem
If you are using your own modem and the settings need to be updated to connect to your Wi-Fi, see the settings below for Fibre, VDSL & ADSVL.
Fibre settings if you are using your own modem:
Interface
Ethernet
Encapsulation
802.1Q
Operating Mode
MDI/MDIX
VLAN Tagged
Disabled
VLAN Priority
Disable
Connection Auth Type
PPPoE
PPP Username
pulseinternet (or anything)
PPP Password
password (or anything)
Reconnect Mode
Always on
Address Mode
Dynamic IP
MTU
Auto
NAT
Enabled
IPv6
Enabled
DNS Type
Automatic
VDSL settings if you are using your own modem:
Interface
PTM
Encapsulation
802.1Q
Operating Mode
VDSL2
VLAN Tagged
Enabled
VLAN ID
10
VLAN Priority
Disable
Connection Auth Type
PPPoE
PPP Username
pulseinternet (Or anything)
PPP Password
password (Or anything)
Reconnect Mode
Always on
Address Mode
Dynamic IP
MTU
Auto
Enable NAT
Enabled
IPv6
Enabled
DNS Type
Automatic
ADSL settings if you are using your own modem:
Interface
ATM
Encapsulation
VC MUX
ATM QoS
UBR Without PCR
VPI
0
VCI
100
Operating Mode
ADSL2+: Auto or G.992.5 Annex A
VLAN Tagged
Disabled
Connection Auth Type
PPPoA
PPP Username
pulseinternet (or anything)
PPP Password
password (or anything)
Reconnect Mode
Always on
Address Mode
Dynamic IP
MTU
Auto
Enable NAT
Enabled
IPv6
Enabled
DNS Type
Automatic
-
When will my Broadband be connected?
Your Black Box Power Broadband connection will go live by 5pm on the day you have requested your connection. We recommend that you do not plug in your modem until this time, to ensure it connects to the right service provider.
If you require a new Fibre install, our agent will be in contact with you to arrange a suitable date.
The earliest install date for your new connection will be 4 working days following sign up.
Wireless Broadband
-
Do I need to be an electricity customer?
Yes, Wireless Broadband is only available if you have electricity with us at the same address.
- Who can get Wireless Broadband?
-
What Wireless Broadband plans do you have?
We offer two plans: Wireless Pro (Unlimited data) and Wireless Lite (300GB). To see our plans, visit blackboxpower.co.nz/broadband/
-
How long will it take for my Wireless Broadband to be set up?
Your modem will be dispatched 3 working days before your scheduled connection date. Once it arrives, simply follow the instructions in the Modem Quick Start Guide to set it up. Your Wireless Broadband will then be ready to use from your connection date.
-
Is data unlimited?
Yes, unlimited wireless is available on our Wireless Pro plan, but a fair use policy applies. Our Wireless Lite plan will be limited to 300GB.
-
Do I get a modem included?
Yes, we will provide you with a compatible modem for this service. There is no upfront charge for your modem, but if you leave within the Initial Term of 12-months, a Fixed Wireless Modem Fee will apply if the modem is not returned within 20 days.
My Account
-
Why have I been charged twice for Broadband on my first bill?
Your broadband payments are charged a month in advance. On your first Black Box Power Broadband bill you will have a pro rata monthly charge as well as a monthly charge. On your next bill, there will only be one monthly charge.
-
I am moving house, how do I transfer my Broadband?
Please contact our Customer Care Team to arrange the broadband connection at your new home. We recommend that you give us 30 days’ notice.
-
What is your Fair Use Policy?
Our Unlimited Broadband and Phone Packages are designed for personal use by residential customers.
Our Fair Use Policy has been developed by reference to average customer profiles and estimated customer usage of our services. From time to time, we may monitor usage patterns. If your usage of our services materially exceeds estimated use patterns over any week or month or is inconsistent normal usage patterns, we may contact you to advise you that your usage is in breach of our Fair Use Policy.
We will request that you adjust your usage patterns to come within our Fair Use Policy. If your excessive usage continues then you may be charged for the Excessive part of your usage at our Standard Rates and the Services may be suspended. Our Standard Broadband rates are $0.1+GST/GB and our Standard Phone Rates can be found here.
-
Will I be charged if you block my Broadband?
If you do not pay your bill by the due date, we may restrict your broadband services.
If your services are restricted, you will be charged a $12 blocking fee and a $12 unblocking fee for us to release the restriction of your broadband services. If your bill remains unpaid, we may cancel your broadband account with us.
All prices include GST.
-
How do I change the name of my WiFi and password?
If you have the Dlink DVA-2800 modem, which is provided by us, please follow the steps below.
Please note: We are unable to provide support for modems that are not supplied by us.
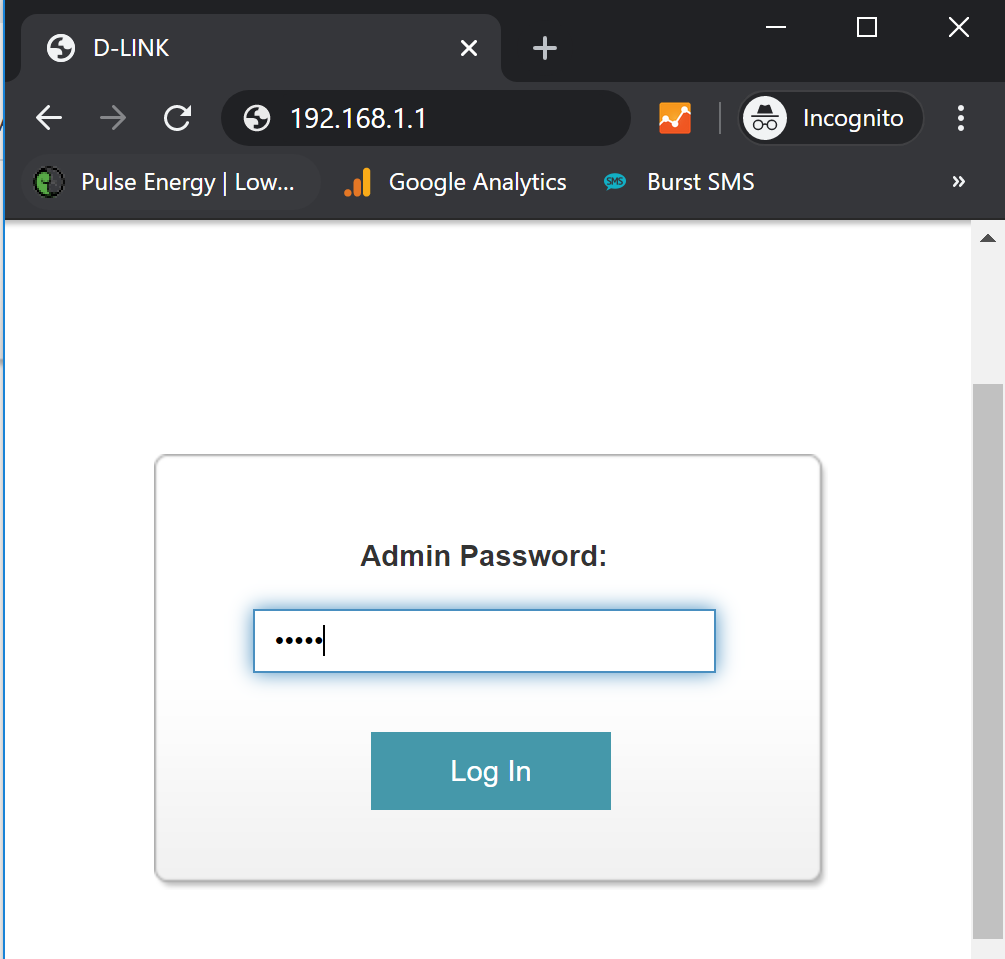
1. Open your internet browser (E.g. Internet Explorer or Google Chrome) and in the address bar type: http://192.168.1.1
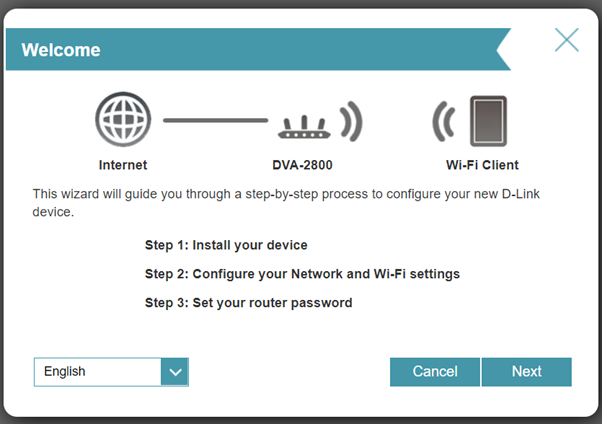
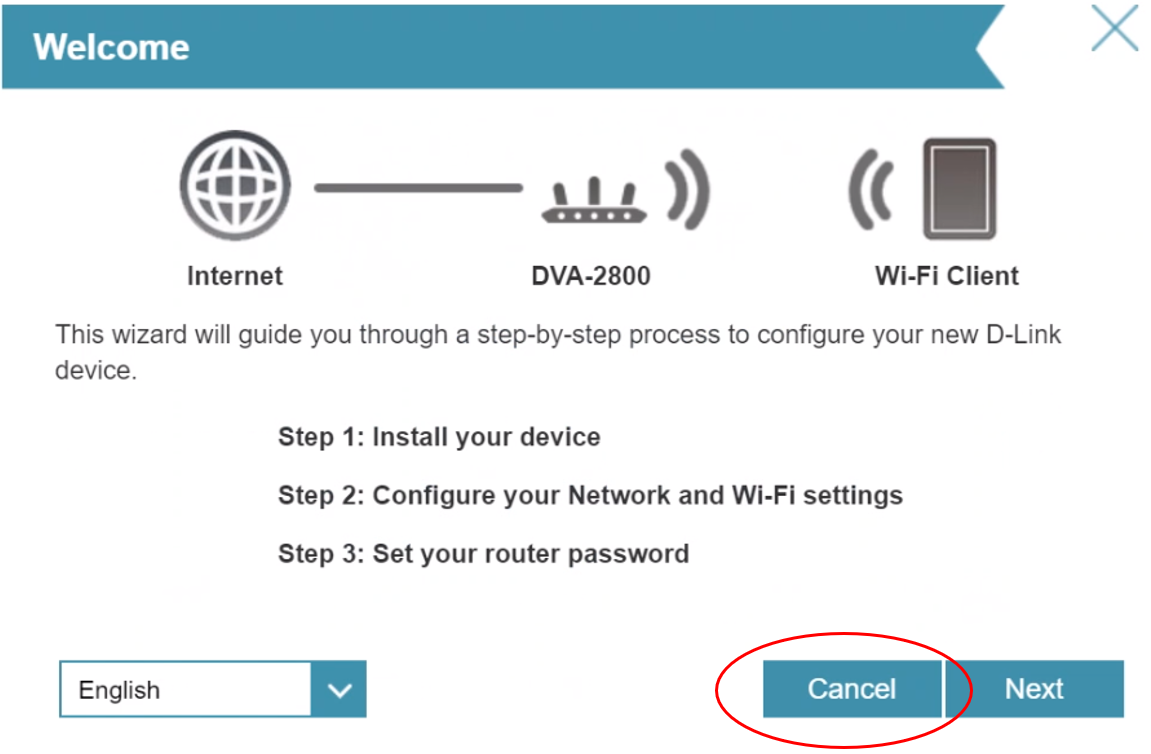
If you are prompted with a ‘Welcome’ Page, please select ‘Cancel’ as you do not need to manually configure your Router to connect to the Internet.
If you are prompted to input a password, this will be ‘Admin’ by default.
Change your WiFi Network Name
2. To change the WiFi Network name, select the Tabs: ‘Settings’ & ‘Wireless’.
Here you can change the WiFi Name (SSID) of both the 2.4GHz & 5GHz WiFi frequencies.

The differences between the two frequencies are the range (coverage) and bandwidth (speed) that the bands provide.
The 2.4 GHz band provides coverage at a longer range but transmits data at slower speeds.
The 5 GHz band provides less coverage but transmits data at faster speeds.
You may wish to have the same Wi-Fi Name to assign in the 2.4Ghz & 5GHz fields as this will assist your devices in connecting to the most optimal frequency depending on how far away you are from the Router.
Change Your WiFi Password
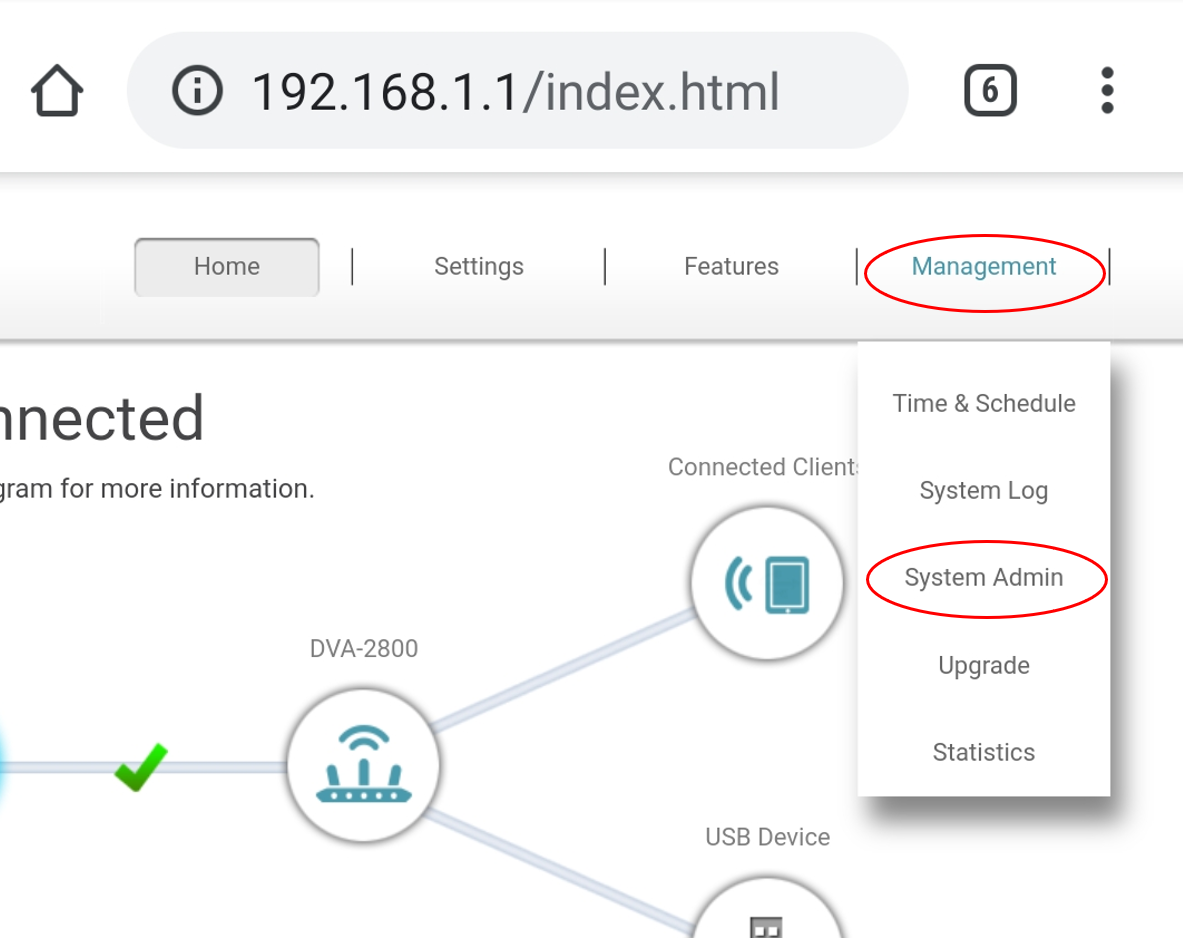
3. To change the 'Admin’ Password you use to log in to the Router in your Web browser - Go to ‘Management’/ ‘System Admin’.
Here you change the Admin password and select ‘Save’.
-
How do I reset my modem?
To do a factory reset on your modem, follow the steps below.
Log into the modem
You can do this via WiFi (SSID: D-Link DVA-2800) or by connecting the yellow ethernet cable from the yellow LAN port on the modem to connect to your computer.
- Open a web browser (such as Chrome or Internet Explorer), and type in 192.168.1.1 in the address bar.
- When asked for the password, write ‘admin’ as a default
- From the top right hand menu select ‘Management' then from the drop down click 'System Admin'
- When you are in the System Admin Screen, you will then need to click ‘System’ from the top right hand corner.
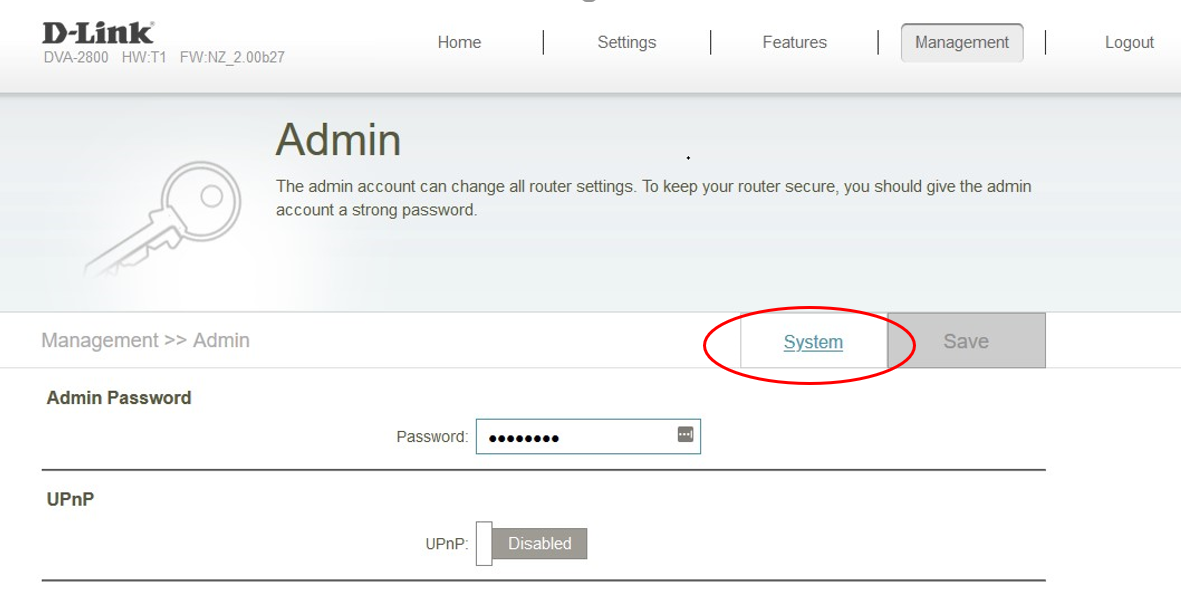
- Once in the System screen, you will then see Restore to Factory Default Settings, click ‘Restore’ next to this and click ‘OK’
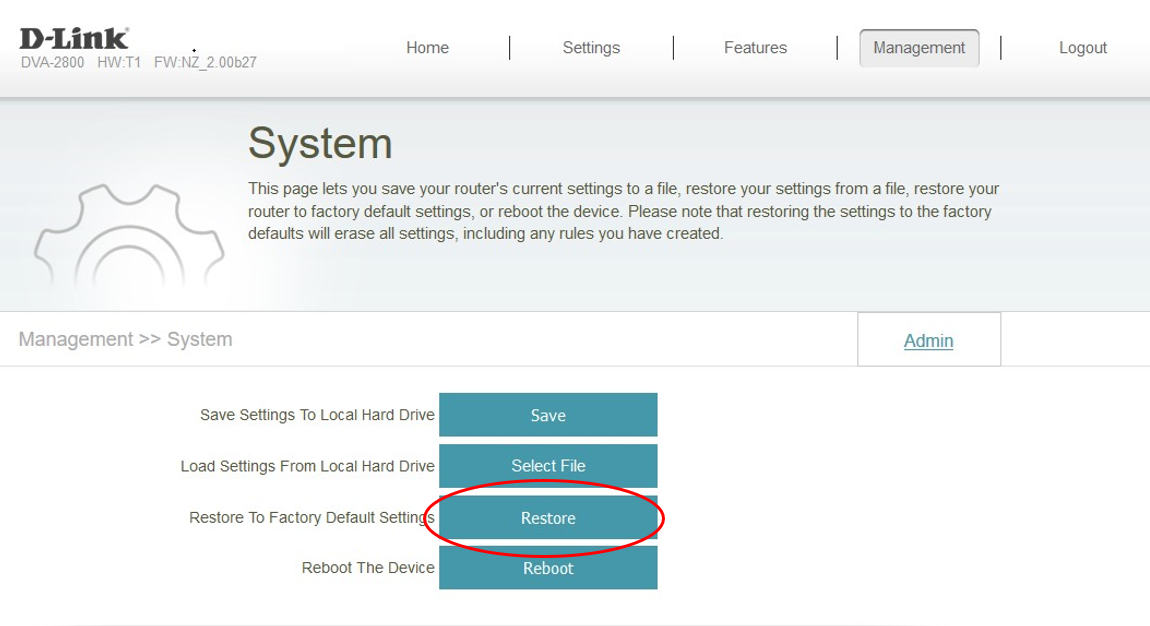
This will reset the Router to Factory settings.
The internet light on the router will turn Red for 10 Seconds, before turning Green.
Please make sure that if you have to log into the Router again, click 'CANCEL' if prompted with Welcome Wizard. The Modem should already be configured after Factory Reset.
Copper & Fibre Connection
-
How do I know if I have a Fibre or copper connection?
If you are unsure which connection is available at your home you can enter your address in the form at the bottom of our broadband page here or visit the broadband checker on the chorus website. If Fibre is available at your home, but you do not currently have a Fibre broadband connection, we may be able to arrange this for you.
-
Can I change from copper (ADSL / VDSL) to Fibre?
Yes, if Fibre is available at your home you can upgrade from a copper connection.
When signing up for our broadband service, please mention this to our team and we will arrange for a Chorus Fibre install technician to visit your property to upgrade you to Fibre.
The technician may need to make more than one visit to your property.
Please make sure you contact your old broadband provider to cancel your old plan when you switch from an ADSL / VDSL plan to Fibre to avoid being billed twice.
-
Why should I upgrade to Fibre?
Fibre optic broadband uses fibre optic cables to send data. It provides a much faster internet connection compared to traditional copper (ADSL / VDSL) connections. For more information on upgrading to Fibre, click here.
-
Do I need to be home when the Chorus Fibre Install Technician visits my home to install Fibre?
Yes, you will need to be home. The technician will need to install the ONT inside your home.
-
How long will it take the Technician to install Fibre?
3 - 6 hours
-
Can I change the date that my Fibre gets installed?
If you need to change the date that the Install Technician visits your home, you must give at least 3 days’ notice. To change this date, please contact us. You will need to be home when the technician visits your home.
Phone Calling
-
How can I add a phone to my plan?
To add a phone package to your service with us, please contact our Customer Care Team. To learn more about our phone packages click here.
-
Can I call phone numbers and countries outside of my plan?
Yes, you can. These will be added to your next bill. For a list of charges and countries click here.
-
Can I get a record of my phone calls?
For a transaction list of phone calls, please contact our Customer Care Team.
-
My phone line is not working
If your phone line is not working, please check that your telephone handset is correctly connected to the VOIP1 port of your modem router. You may also need to reset your modem by following the steps below:
- Unplug your telephone handset from the VOIP1 port on the back of your modem.
- Power off your modem and unplug from your wall power socket.
- Wait 10 minutes before turning your modem back on and plugging in your telephone handset back into the VOIP 1 port.
Note: If you have a Fibre connection, your phone line will require an electricity supply to work. We recommend that you always have a charged mobile phone in case of emergency.
-
I have had Fibre installed, will all the phone jacks in my home still work for phone calling?
Yes, if your home’s internal wiring has been set up by the Fibre Install Technician.
To check, you can connect your modem router to a phone jack on your wall. Once this has been done, you should be able to plug your phone headset into any wall phone jack in your home.
-
How do I set up my voicemail?
Dial *52 to access your mailbox for the first time
Press *55 - this will access your mailbox
Press 0 for voicemail settings then press:
1 – To setup an unavailable message
2 – To setup a busy message
3 – To setup your mailbox name
4 – To setup a temporary greeting
5 – To change your mailbox PIN number
Press # when you have finished recording and follow the prompts.
The 111 Contact Code: Ensuring Emergency Access
-
What is the 111 Contact Code?
-
Who is eligible to apply under the 111 Contact Code?
You can apply to be included in the 111 Contact Code, which ensures you have a reliable way to call 111 during a power outage, if you meet all three of the following criteria:
- Your landline service is currently with Pulse Energy.
- You or someone in your household is at increased risk of needing emergency services due to health, safety, or disability reasons (either now or in the near future).
- In the event of a power outage, you or someone in your household has no alternative means to contact 111 that can function for a continuous 8-hour period.
What does it mean to be "at particular risk of requiring the 111-emergency service due to health, safety, and disability reasons"?
Being "at particular risk" refers to individuals who are more likely than others to need emergency services because of specific circumstances affecting them. These may include health conditions, safety concerns (like family violence), or disabilities, including sensory, intellectual, or physical impairments. These conditions may be present now or anticipated in the future, such as being scheduled for surgery.
When are you ineligible to apply?
You will not be eligible to apply if you or the individual seeking coverage under the 111 Contact Code already has an alternative way to contact 111 during a power outage. Examples include:
- Having a copper landline service, which continues to function during a power outage.
- Having unrestricted access to a mobile phone and sufficient mobile coverage at your location.
- Having an uninterruptible power supply (like a battery backup) that allows you to call 111 during a power cut.
If you meet the eligibility criteria, please see below for information on how to apply.
-
How can I apply?
You can apply for yourself or on behalf of someone in your household by downloading and completing the 111 Contact Code application form. Once completed, return it to us via email at data.admin@pulseenergy.co.nz or by post to Po Box 10044, Auckland 1446. The form must be filled out by the account holder or an authorized representative.
After we receive your application, we will review the information and notify you if you qualify for coverage under the 111 Contact Code. If you do qualify, we will add you to our 111 Contact Code register and provide you with an appropriate device to ensure you can make 111 calls (such as a mobile phone capable of calling 111 or a battery backup).
What information do I need to provide to support my application?
To support your application, you can either provide sufficient evidence demonstrating why you (or the person you're applying for) are at particular risk of needing the 111-emergency service, or you can nominate someone we can contact to verify the circumstances.
Examples of acceptable evidence include:
- A completed Electricity Authority ‘Notice of Potential Medically Dependent Consumer (MDC) Status’ form, certified by a District Health Board (DHB), private hospital, or GP (available on their website).
- A protection order.
- A letter from a health practitioner (e.g., a GP).
- Documentation of impairment (e.g., an ID card).
The nominated person must hold a profession that qualifies them to assess whether you (or the person on whose behalf you are applying) are at particular risk of requiring 111 emergency services. We recommend discussing the application with the nominated person before submitting it.
If you have any questions regarding the form or the 111, Contact Code, please reach out to us at 0800 269 769. Alternatively, you can contact the Commerce Commission at contact@comcom.govt.nz or call their Enquiries team at 0800 943 600.
DOWNLOAD APPLICATION FORM HERE
Please return the completed form to us via email or post to:
Po Box 10044,
Auckland 1446
It can take up to 10 business days to process an application once we receive it. Once we have completed that we'll be in contact with you to let you know the outcome.
-
Who do I contact to file a complaint about the 111 Contact Code?
At Black Box Power, we highly value customer feedback and are committed to addressing any complaints promptly. If you have concerns about the service you’ve received, please reach out to us as your first point of contact at customer.care@blackboxpower.co.nz alternatively you can call us on 0800 269 769.
If you remain dissatisfied with Black Box Power's service or its responsibilities under the code, you can refer the dispute to the Telecommunications Dispute Resolution Scheme (TDR) by calling 0508 98 98 98 or visiting their website. The Telecommunications Dispute Resolution Scheme offers a free, independent service to assist consumers with complaints about their telecommunications provider related to their rights and obligations under the 111 Contact Code.
Alternatively, you can file a complaint with the Commerce Commission by calling 0800 943 600 or emailing contact@comcom.govt.nz regarding compliance with the Code.
Our preferred method for handling complaints is for you to contact us directly. If the issue remains unresolved, you can refer the dispute to the TDR on 0508 98 98 98 or visiting their website.
-
What is the 111 emergency services?
The 111 emergency services include the ambulance service, police service and fire and emergency service.
Outages & Performance
-
What happens if there is a broadband outage?
To check if there is an outage in your area, please click on your Network Provider below.
When your outage has been fixed, you will need to reset your modem to reconnect to the network.
For more information click here.
-
My Wifi is slow
If your connection is slow, there may be too many devices using your broadband connection and there may be a better plan for your household usage.
To upgrade to a faster plan, you can view your options here or contact us.
For Wireless Connections: Make sure your router isn’t blocked by any large obstacles or located near a hot water cylinder, mirror or filing cabinet. You may also need to move the modem so that it is in a central location of the house or switch between your two Wifi connections (D-Link DVA-2800 & D-Link DVA-2800 5GHz).
For ADSL or VDSL connections: You may need to move the cables away from any appliances that may interfere such as microwaves or fridges. If Fibre is available in your area it might be worth upgrading. To do so, please contact us.
For more tips visit 'How to fix slow Wi-fi'
-
My internet is not working
If your internet is not working, you may need to:
- Check if there is an outage in your area
- Check all cables are plugged into the correct ports
- Unplug your modem from the wall power socket, wait 30 seconds before plugging back in
- Restart your modem and wait 30 seconds before turning back on
- Check that the correct lights are displaying on your modem.
- ADSL or VDSL: power, internet and DSL LEDs should display
- Fibre: power, internet and WAN
- If Wifi is not working, you may need to press the ‘Wifi’ button to ensure the 2.4G & 5G Wifi lights are green.
For more modem trouble shooting information please click here.
Alternatively, you can contact our Customer Care Team here.
-
How do I measure my speed?
To measure the speed of your broadband you can use a free independent website, such as www.speedtest.net
Before testing, make sure the Wifi on your modem is turned off and that no internet use is in process (Such as Netflix or downloads). You will need to make sure the device you are testing is plugged directly into your modem via the ethernet cable.
If you are not getting the desired result, please change the server to ensure it is not an issue with the remote server.
-
What can affect my Broadband performance and speed?
There are a number of factors that can affect your Broadband performance and speed. For a list of tips and suggestions to help your Broadband connection click here.
If you are still concerned about the speed of your connection, we recommend you do a speed test or contact our Customer Care Team.
-
Will my Broadband work if there is power cut?
Your modem relies on electricity as a power supply so your broadband connection will not work if there is a power cut. It is a good idea to always have a fully charged mobile phone in case of emergencies.
Cancellation
-
How do I cancel my Black Box Power Broadband account?
To cancel your broadband plan, please contact us.
You will be required to give us 30 days’ notice and any outstanding charges will be added to your final bill.
If you have requested a Black Box Power modem and decide to leave Black Box Power Broadband within 24 months, you will be required to pay a $170 Modem Fee.
All prices include GST.
-
I have changed my mind, can I cancel my Broadband account?
If you have signed up online, you will be required to give us 30 days’ notice.
If you signed up with one of our door to door or outbound sales agents, you have the right to cancel free of charge within 5 days of signing up.
If your modem has been sent, you are required to send this back to us unopened within 14 days of receiving it. Please note a Modem Return Fee of $20 will apply.
If your modem has been opened or damaged or is not returned within 14 days you will be required to pay the full Modem Fee of $170 and Modem Delivery Fee of $20.
Modem must be sent in a tracked courier to Black Box Power, Level 5, 33 Enfield St, Mt Eden, Auckland 1024. You can request a tracking return label free of charge by contacting us. Please note you will need access to a printer.
All prices include GST.
-
I have received the modem in the mail, but I have since cancelled my Broadband account. What do I do with the modem?
You will need to return your modem in a tracked courier to Black Box Power, Level 5, 33 Enfield Street, Mt Eden, Auckland 1024 within 14 days. Please note a Modem Return Fee of $20 will apply.
If the modem is not returned within 14 days you will be billed $170 for this.
You can request a tracking return label free of charge by contacting us. Please note you will need access to a printer.
All prices include GST.